A savvy collection of craft projects & tutorials, recipes, & fun things to do with your kids!

Saturday, November 24, 2012

Keepsake Calendar


 Made from hand and footprints, this special keepsake calendar makes a one-of-a-kind, fabulous gift for grandparents. You don't need mad artistic skills (mine are very limited), but this calendar is VERY time consuming. Scroll to the bottom of the pictures for a list of supplies needed and a step-by-step how to.


SUPPLIES:

Bare Accents 12x12 blank white calendar
12x12 cardstock  (see pictures for colors) one sheet for each month
foam paint brushes
small paint brushes
paint markers to add details (I used the Sharpie brand)
acrylic paints (see pictures for colors)
scrapbook paper in various colors (I used papers that coordinated with my monthly painting)
scrapbook adhesive

* I used my Cricut to cut out the months, but you could just as easily do this on your computer. I used the DoodleCharms and Designer's Calendar cartridges.

* I found inspiration for all of my basic handprint and footprint ideas on Pinterest.


INSTRUCTIONS:

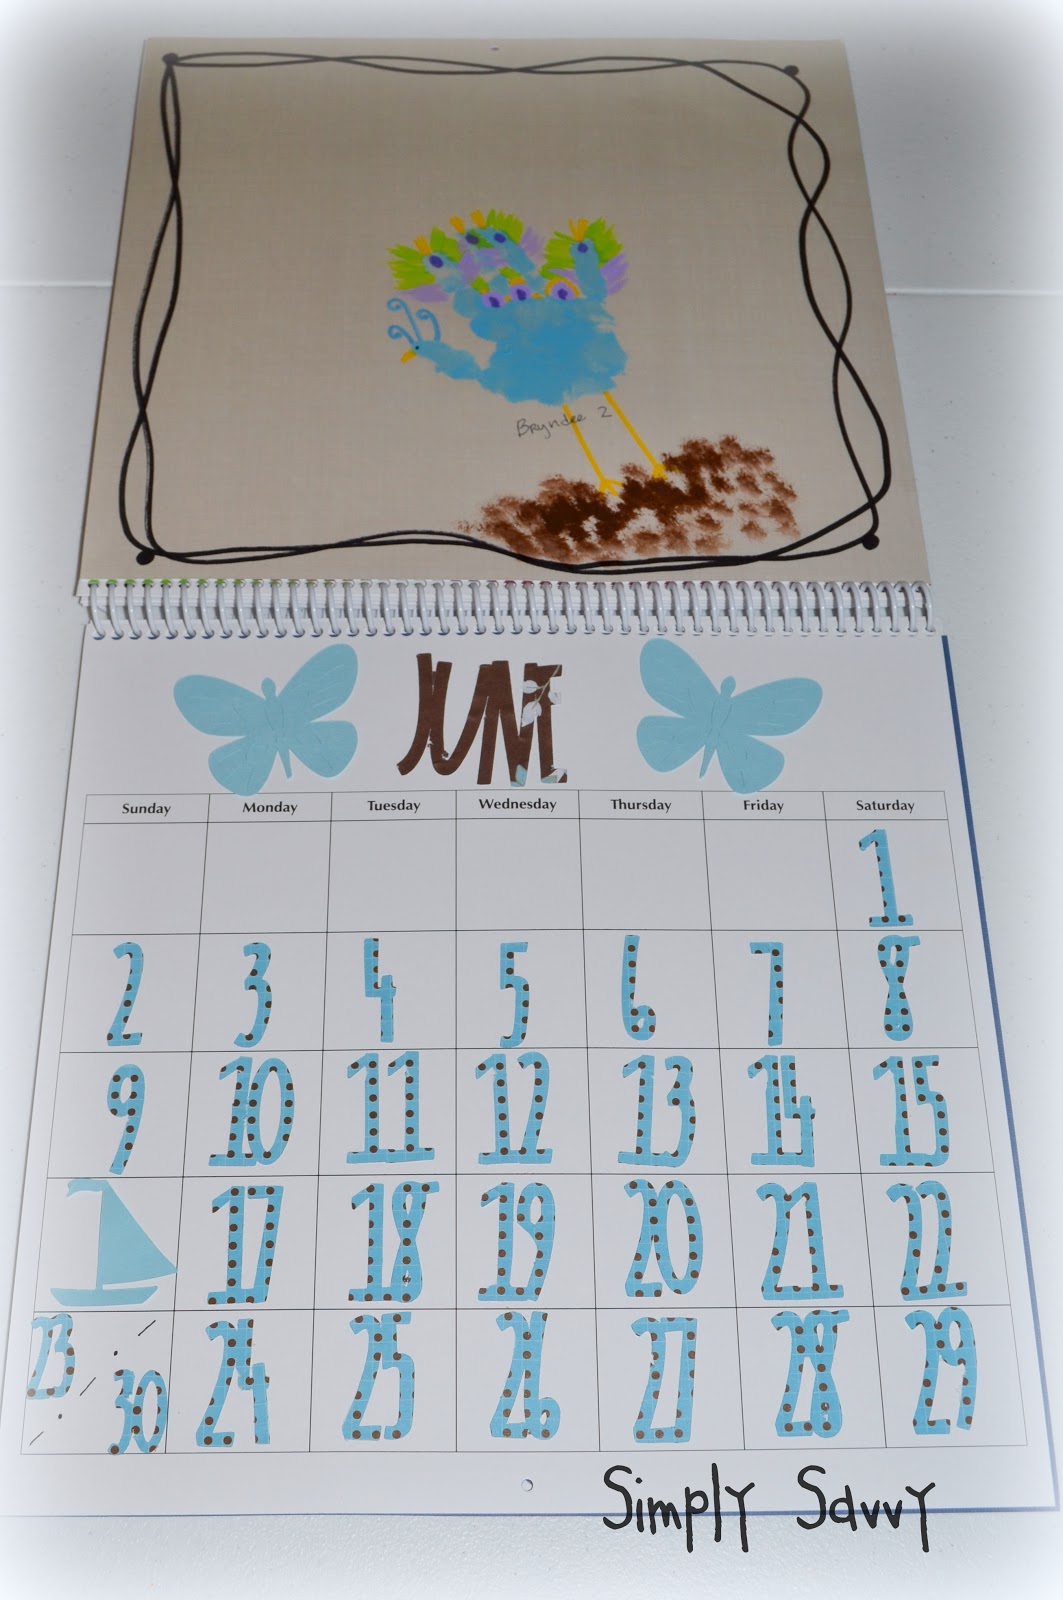
Step 1: Use the foam brushes and the acrylic paints for all the handprints and footprints. On my husband's side of the family there are 12 grandkids so I did one child for each month. Allow to dry overnight.

Step 2: Using the smaller brushes and the paint markers, add detail to your calendar pages. I drew a border around each month just to help tie them together.  Allow to dry and adhere to calendar.

Step 3: Using your die cut machine, computer, or what have you, cut or print the months and the days. For each major holiday I used a fun cut-out rather than a number. Also, half way through the year I started printing my numbers on cute scrapbook paper and then used Stampin' Up punches to punch out the numbers. This was WAAAAY faster, and I think I might like the way it looks a tiny bit more, too. Adhere all pieces to calendar.

I would love to see pictures of how your calendar turns out!


Sunday, September 16, 2012

Emersyn


Last night I took my Emersyn, age 6, out for a photo shoot.  We had such a fun time!  Here are just a few pictures.  More to come soon!

Sunday, November 27, 2011

Simple Handprint Snowman Keepsake Ornament

I wanted to come up with a super cute, yet cost effective, keepsake ornament that my preschoolers could give to their parents for Christmas. This would also be a cherished gift for grandparents.

Supplies Needed:

Clear plastic ornaments (I found a 4 pack at Michael's for $2.50)
Silver Tinsel
White acrylic paint
sponge paint brush
paint markers in black, orange, and other assorted colors for the scarfs (I used the Sharpie brand)
spray sealer
ribbon
poem


Step 1: Wash and thoroughly dry child's hand. Use the sponge paint brush to apply a good amount of the white paint to child's palm and fingers.

Step 2: Set the ornament on the child's palm and have him close his fingers around the sides of the ornament. Allow the ornament to dry.

Step 3: Fill the ornament with tinsel.

Step 4: Using the paint markers, add detail to the snowmen. I did a face and buttons on every snowman, and added a top hat and scarf to every other snowman. Allow to dry.

Step 5: Spray a coat of clear sealer on the ornament and allow to dry overnight.

Step 6: Attach a copy of the following poem to the ornament with a ribbon:

Five Little Snowmen all in a line,
They might look familiar because the handprint is mine.
Snowmen will melt cause they're just made of snow,
Cherish this handprint because I will grow!

Have the child add his name and the year on the bottom of the tag.

That's it! A fabulous keepsake any parent or grandparent would love!


Tip Junkie handmade projects

Link Party

Wednesday, July 28, 2010

And the Winner Is.......

Commenter #15, Adrienne! Congratulations! Enjoy your planner and printable planner pages!

Sunday, July 18, 2010

Giveaway: Personal Planner & Printable Planner Pages


Get organized and stayed organized with this fabulous personal planner! I created and designed these and it is what I use myself to keep my life in order.

This personal planner is 5 1/2 inches by 8 1/2 inches in a pretty, vibrant floral design. Each of the 8 tabbed dividers are covered in extra sturdy page protectors for durability. The sections are:

Monthly Calendar
Daily Planner
Week At A Glance
Birthdays & Addresses
To Do List
Meal Planning (featuring a menu plan form & a shopping list)
Task Tracker
Notes

The winner will also receive the PDF files of all the planner pages so they can refill the planner as needed!

To enter, simply leave a comment on this post letting me know in what way you need to better organize your life.

For a second chance, become a follower of Simply Savvy and leave a comment letting me know you have done so. If you are already a follower, no problem! Just leave me a second comment for another chance to win.

This contest will close Wednesday, July 28 at 10:00 pm MST. The winner will be announced Thursday morning.

Good Luck!

Friday, July 16, 2010

New York Style Thin Crust Pizza


My husband has been wanting to make a New York style pizza, so I searched the web and found this recipe on Food Network. It's definitely worth the work!

Homemade Sauce:
2 cups tomato sauce
4 T. olive oil
Italian Seasonings to taste

Mix all ingredients together in a medium size bowl.

Basic Pizza Dough:
1 package active dry yeast
2 t. sugar
1 cup warm water
1/4 cup vegetable shortening
3-4 cups all purpose flour
2 t. salt
olive oil

Whisk the yeast, sugar, water, and shortening together to make a paste. Add the flour and salt and mix, using a dough hook, until the dough comes away from the sides and crawls up the dough hook. Remove the dough from the bowl. Grease the bowl with olive oil and place the dough back in the bowl. Cover the bowl with plastic wrap and let the dough rise until doubled in size, about 1 hour. Turn the dough onto a floured surface and divide dough in half. Roll the dough into balls, cover, and let the dough rest for 15-20 minutes. The dough is ready to be shaped.
Makes 2-12 inch pizzas.

Pizza
1 recipe pizza dough
cornmeal, for dusting
4 T. olive oil
2 cups tomato sauce
1/2 cup fresh basil leaves
1 cup shredded parmesan cheese
1 lb. shredded mozzarella

Preheat the oven to 500 degrees. If you have one, place a pizza stone on the bottom rack of your oven. Dust pizza peel of baking sheet with cornmeal. Place rolled dough on peel. Brush dough with 2 T. olive oil. Spread 1 cup tomato sauce evenly over dough, leaving a 1/2 inch border along the edges. Sprinkle 1/4 cup basil leaves on top of sauce and then sprinkle with cheese. Add additional toppings if desired. Bake for about 8-10 minutes or until cheese is bubbling and the edges are golden brown. Repeat with remaining ingredients to make two pizzas.

Tuesday, July 13, 2010

Fab Feature: Becca from Jumping Jax Designs

I am super excited to introduce you to the cute and very talented Becca from Jumping Jax Designs.

I came across Becca's blog while I was searching for custom blog designs. Not only does she have some of the cutest blog designs out there, but she also offers cards, monograms, and logos. And did I mention that her prices are out of this world phenomenal? Her basic blog design is only $10 or you can get a complete makeover for only $45! (That is on my gotta have it & soon list!)


Some of her cUtE card designs:


When I asked Becca how she got her start, this is what she told me:

I have always loved fashion and had a knack for creative design, but since I went to college to be a teacher, I didn't really have an outlet for that. When I had my son last year, I just knew that daycare wasn't for our family. I wanted to stay home with him, but somehow still bring in money, doing something I loved. It was my mother-in-law who finally gave me the swift kick in the pants to get my own business going last August. I started by getting Photoshop and totally teaching myself how to use it. I wound up crying more nights than I can count because it's VERY difficult to learn without someone to teach you. I slowly figured out what I was doing, and created my first card for a friend's birthday party in October of last year. I was on a message board called TheBump.com where girls were ALWAYS needing birthday invitations & birth announcements, so when I would make one for someone, they would show it off, and link up my shop. I became the go-to person for design needs, and I have sort of branched out from there!


What inspires your creativity and designs?

I am kind of on-the-fly about my designs. I don't know all of the technicalities of design by any means, I just create whatever I dream up. I can be walking through Target and see cute little girls' clothes that inspire me, or think of a color combo while I'm laying in bed at night, and quickly jot it down before falling asleep. I have taken inspiration from wall art, clothing, home decor, and even food!


Here is a look at some of her fab blog designs:


I asked Becca what makes her designs unique and she said:

I like to think that all of my designs are fun, fresh & exciting. I just don't do "boring". Since my inspiration is drawn from such random aspects of my everyday life, each one is unique, and hopefully unlike anything else you'd come across on the web! :)

What do you like to do when your not creating?

I play with my son! :) I only work when he is sleeping, whether that be at nap time or once he is down for the night. He's my world, and I don't see any point in staying home with him if I'm just going to ignore him for work, you know?

What is your typical day like?

In the mornings, I wake up when Jax does. We have breakfast, play, run any errands that we have and sometimes Jax has occupational therapy. Around noon, we eat lunch, and Jax goes down for his nap at 1pm. I start working at that time, and don't break for even a second until he wakes up, usually around 3-4pm. Then we play some more, wait for my husband to get home, and have dinner as a family. Around 7:30pm, Jax has his bath, book, bottle & goes down for bed at 8, and I get back to work. On a good night, I'll be finished by 10 and can spend some time with the hubby. On a busy night, I have been known to work until 4am. It sounds bad, but I've become used to it, and thankfully have a boy who likes to sleep in until 9am or later! :)

I hope you will take the time to check out her shop! Thanks, Becca, for letting us get a glimpse of your creations and life!